How to Install WordPress Manually and Configure Database?
Though many feel that installing WordPress is an intimidating process, in reality it is not. There are a few simple steps to follow and if you do those correctly, you don’t need to worry. Once you get the hang of it, the process should not take more than 30 minutes.
Downloading WordPress
This is the first step and you are advised to download the latest version released by WordPress (This comes as ZIP file). The download page is here: www.wordpress.org/download. If you wish to be notified about latest releases from WordPress, you can also subscribe using your email id.
Pointing the Domain
Point your domain to the public_html folder (If you want to host a single website). In case of shared hosting, create a specific folder under public_html and point your domain to that folder. Similarly, you can point subdomains as well.
Uploading the File
Upload the downloaded file to your public_html or domain specific folder (Latter case for shared hosting). Now, to upload the file, there are two options:
- You can extract the ZIP file in your local system. Then, using an FTP client such as FileZilla, you can upload the files to your domain.
- Otherwise, you can upload the ZIP itself to the folder via “Upload” option of your hosting provider or you can again use FileZilla for that. Now, “Extract” that ZIP file and all the files will be visible in that folder.
Database Creation and Configuration
You have to locate the Database menu of your hosting account (The exact location may vary depending on your hosting provider). Now, create a new MySQL database by clicking “Add New” button. Add Database name, a password and description. You will have to create a new user as well and password for accessing the database (Take note of that, it will be required later). It may take a few minutes to set the database up properly (Hosting Provider takes care of that) and you’ll see “Pending Setup” for all these minutes. After it is configured, you’ll see “Active” status beside the database.
Adding Database Details in File
After uploading WordPress and un-archiving it, you should see a wp-config-sample.php file. Now, rename this file as wp-config.php. Open this file and add these following lines:
define(‘DB_NAME’, abc_wpress’);
define(‘DB_USER’, abc_wpuser’);
define(‘DB_PASSWORD’, ‘0la;mip’);
In this case, your cPanel username is ‘abc’ and database name is ‘wpress’. Similarly, ‘wpuser’ is the user name and ‘0la;mip’ is the password. Now, save the same.
Finishing Installation
Now, open your web browser and type in the following:
www.yourdomainname.com/wordpress_extraction_folder/wp-admin/install.php
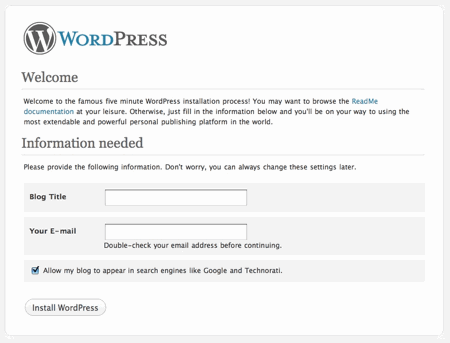
‘yourdomainname.com’ is to be replaced with your domain name; ‘wordpress_extraction_folder’ should be replaced with the folder name where you extracted the WordPress ZIP file. If the wp-config. php file has been edited successfully; you will see a form with self-explanatory instructions to complete the installation. You need to enter some details on the database, enter blog title, select a username and password for the first user to be created (You’ll use this ID/Password for logging in to the Dashboard for the first time). You can even select whether you want the website to be visible to search engines or not.
That’s pretty much all about manually installing WordPress. If you face any problem with any of the steps mentioned above, please feel free to get in touch with me.